


Social login is now an essential part of any site which performs user authentication. It saves the users a lot of time, as they won't need to fill the whole form. They just sign up with their social account and next time they can log into the website with a single click.
Using social media accounts to sign up for websites is common nowadays and preferred by users because they don't have to remember a password every time they log in to a website. Even though social signup is easy, you can also inadvertently end up with a bunch of very confused users in an app.
Login with social accounts is a straightforward process and simultaneously enhances the user experience; nowadays, everybody knows a better user experience is the key to any digital product's success.
What is Laravel Socialite?
Laravel Socialite is a package developed to abstract away any social authentication complexities and boilerplate code into a fluent and expressive interface.
Socialite only supports Google, Facebook, Twitter, Linked In, Github, and Bitbucket as OAuth providers. They won't be adding any others to the list, however, there's a community-driven collection called Socialite Providers , which contains plenty of unofficial providers for Socialite.
In this tutorial, we are going to add Social Authentication to a Laravel app through Socialite , an official Laravel package that makes adding social authentication to a Laravel app.
If you want to manage your VPS / VM Server without touching command line go and Checkout this link . ServerAvatar allows you to quickly set up WordPress or Custom PHP websites on VPS / VM in matter of minutes. You can host multiple websites on a single VPS / VM, configure SSL certificates, and monitor the health of your server without ever touching the command line interface .
Server Requirements
- PHP 7.4
- MySQL
1. Install Laravel Project
First, open Terminal and run the following command to create a fresh laravel project:
composer create-project --prefer-dist laravel/laravel lara-socialite
or, if you have installed the Laravel Installer as a global composer dependency:
laravel new lara-socialite
2. Configure Database Details:
After, Installation Go to the project root directory, open .env file, and set database detail as follow:
DB_CONNECTION=mysql
DB_HOST=127.0.0.1
DB_PORT=3306
DB_DATABASE=<DATABASE NAME>
DB_USERNAME=<DATABASE USERNAME>
DB_PASSWORD=<DATABASE PASSWORD>
3: Create Auth using scaffold
Now, in this step, we will create auth scaffold command to create a login, register, and dashboard. so run the following commands:
composer require laravel/ui
For Generate Login, Register and Dashboard run the following command:
php artisan ui bootstrap --auth
Here some changes in our default users migration file. We need to set default nullable to our password column because in social account login or register we don't need password so here we need to set default nullable to password field.
database / migrations / xxxxxx_create_users_table.php
use Illuminate\Database\Migrations\Migration;
use Illuminate\Database\Schema\Blueprint;
use Illuminate\Support\Facades\Schema;

class CreateUsersTable extends Migration
{
    /**
     * Run the migrations.
     *
     * @return void
     */
    public function up()
    {
        Schema::create('users', function (Blueprint $table) {
            $table->id();
            $table->string('name');
            $table->string('email')->unique();
            $table->timestamp('email_verified_at')->nullable();
            $table->string('password')->nullable();
            $table->rememberToken();
            $table->timestamps();
        });
    }

    /**
     * Reverse the migrations.
     *
     * @return void
     */
    public function down()
    {
        Schema::dropIfExists('users');
    }
}
Run this following command to install node dependency and compile css and js files:
npm install && npm run dev
Social Account Configuration
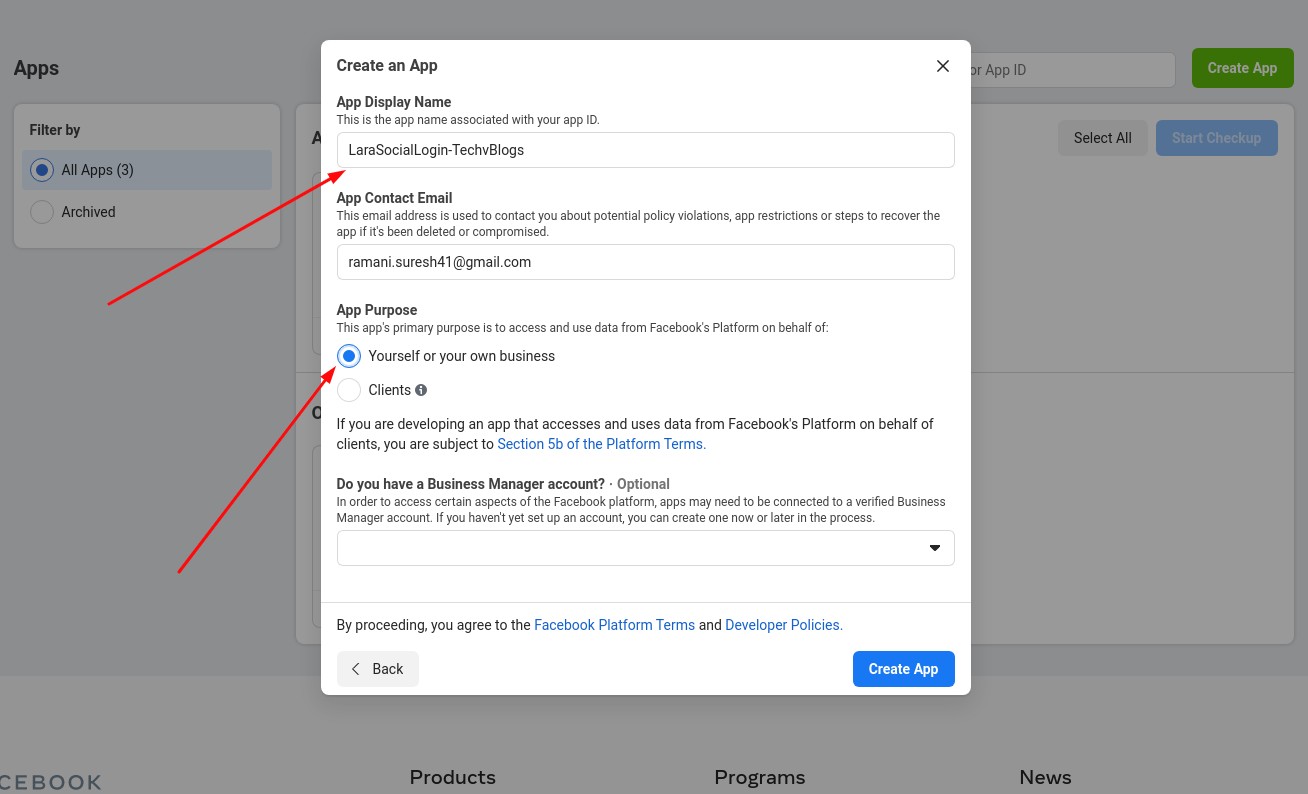
1. Creating A Facebook App
Open this link and follow the below step to create a Facebook app for client id and secret.
As you can see below the image fill all required fields in this form and click on create app button.
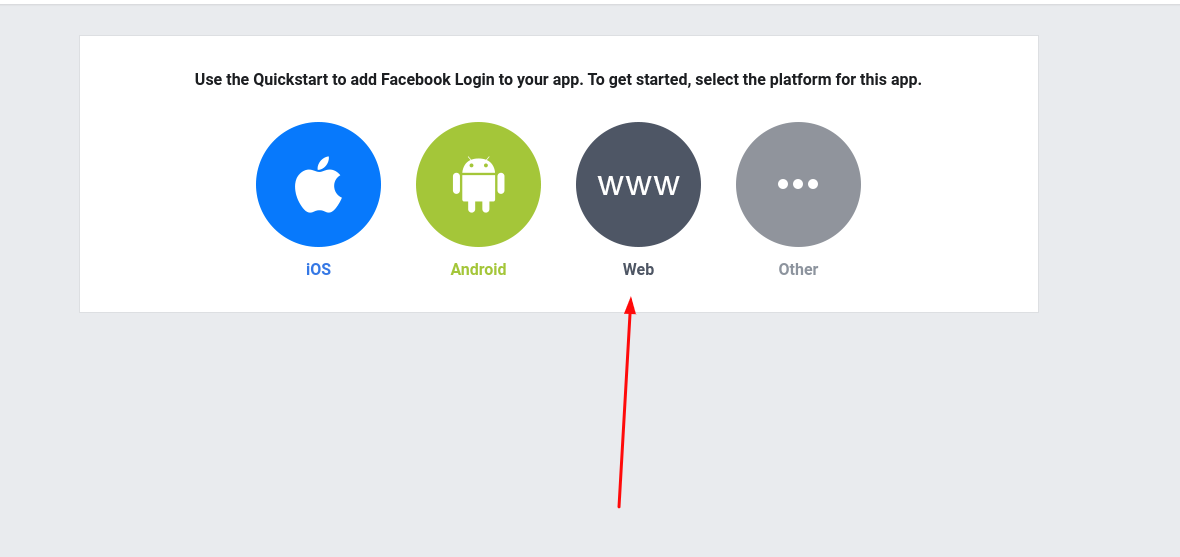
2. Select Platform
Next, let's add Facebook Login capabilities to our app. Click the plus sign next to Products in the side nav.

choose web as your platform.
3. Set your site URL into your Facebook app
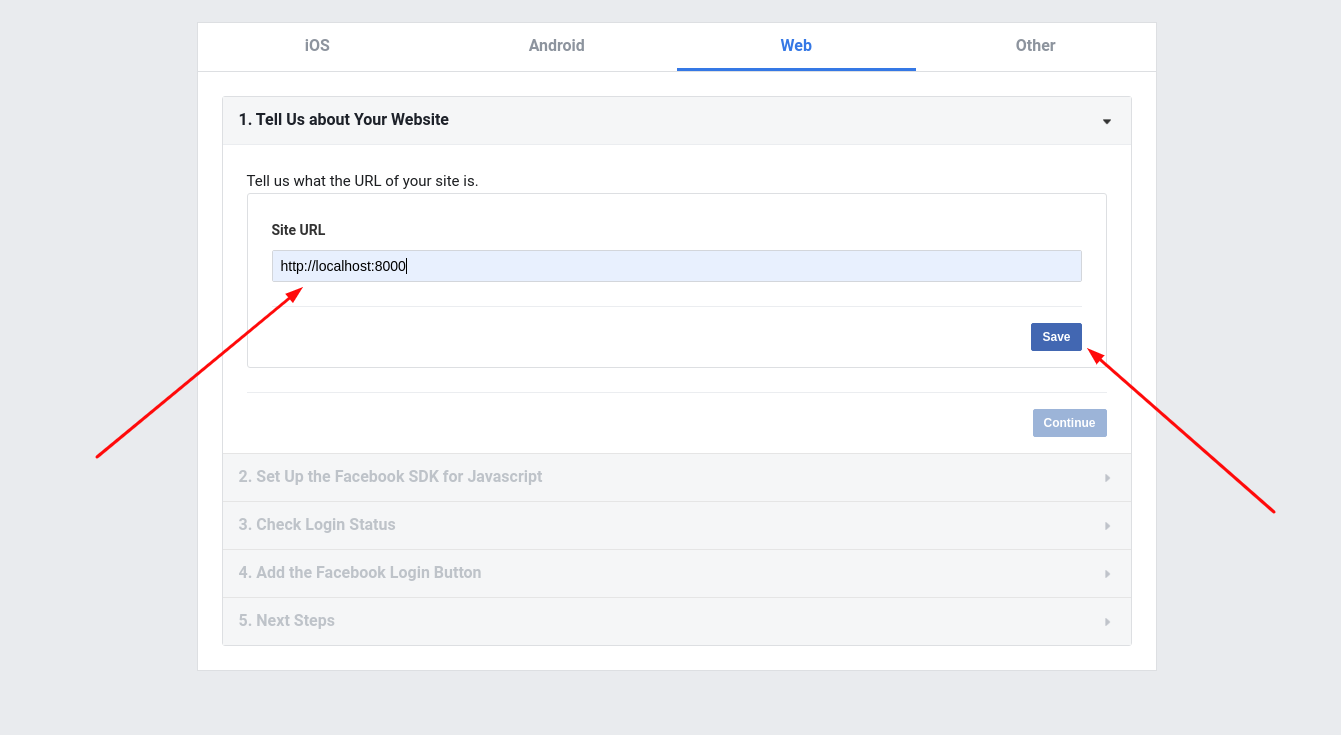
NOTE: You won't be able to use Facebook Login if your site isn't HTTPS , or you will run into errors when trying to authenticate users.
For each of the remaining steps, just click on "next" until you get to the last step.
4. Set Redirect URL
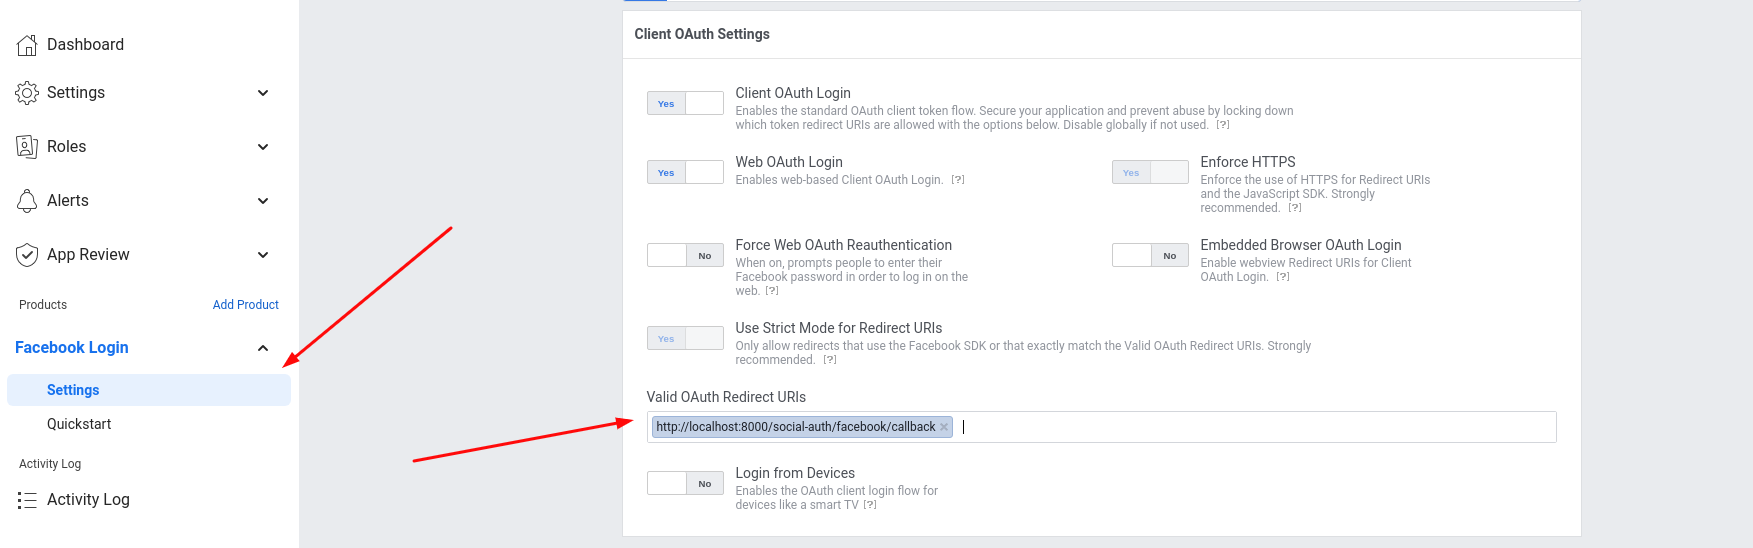
As of my requirement we set redirect url like https://localhost:8000/social-login/facebook/callback. you can set redirect url as of your requirement.
5. Copy Client ID & Secret
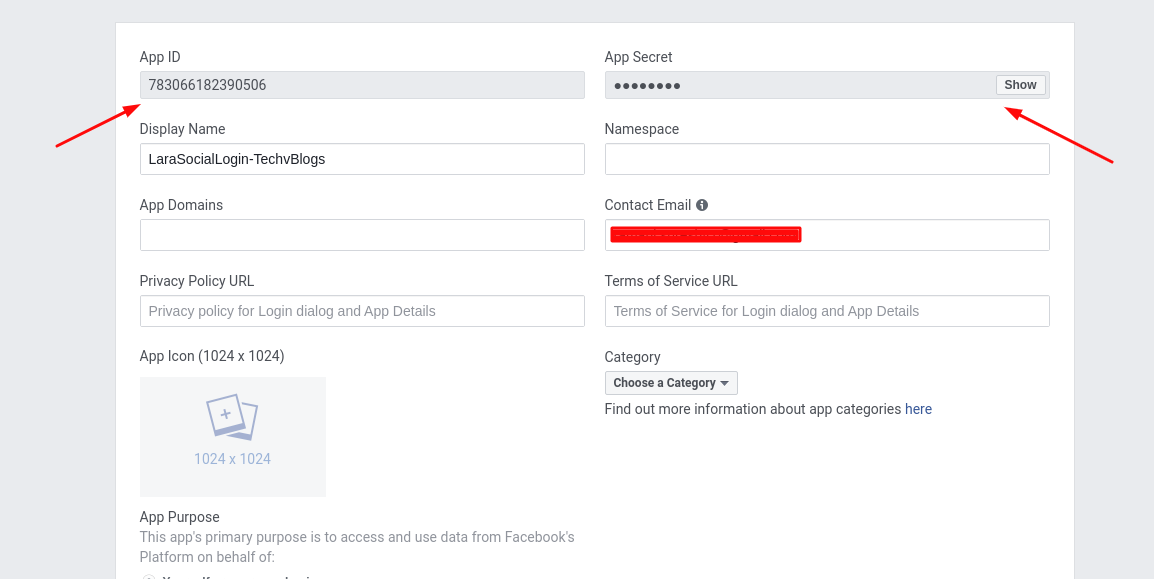
Now update our config/services.php and .env file.
.env
FACEBOOK_CLIENT_ID='YOUR FACEBOOK CLIENT ID'
FACEBOOK_CLIENT_SECRET='YOUR FACEBOOK CLIENT SECRET'
FACEBOOK_CALLBACK_URL="${APP_URL}/social-auth/facebook/callback"
config / services.php
'facebook' => [
    'client_id' => env('FACEBOOK_CLIENT_ID'),
    'client_secret' => env('FACEBOOK_CLIENT_SECRET'),
    'redirect' => env('FACEBOOK_CALLBACK_URL'),
]
1. Creating A Github App
Follow this guide to Create a Github App
Go to the GitHub website click on your profile and last click on Settings. After this, you can see this page as shown below image.
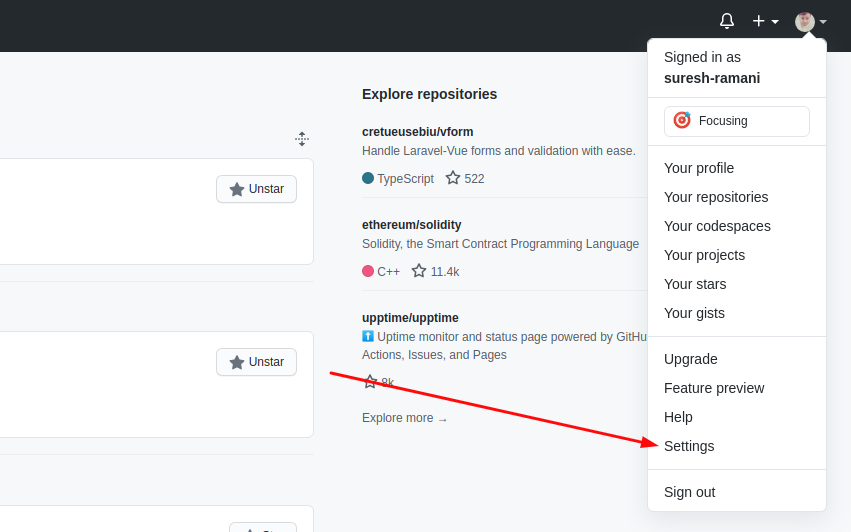
After going to this page click on the Developer setting.
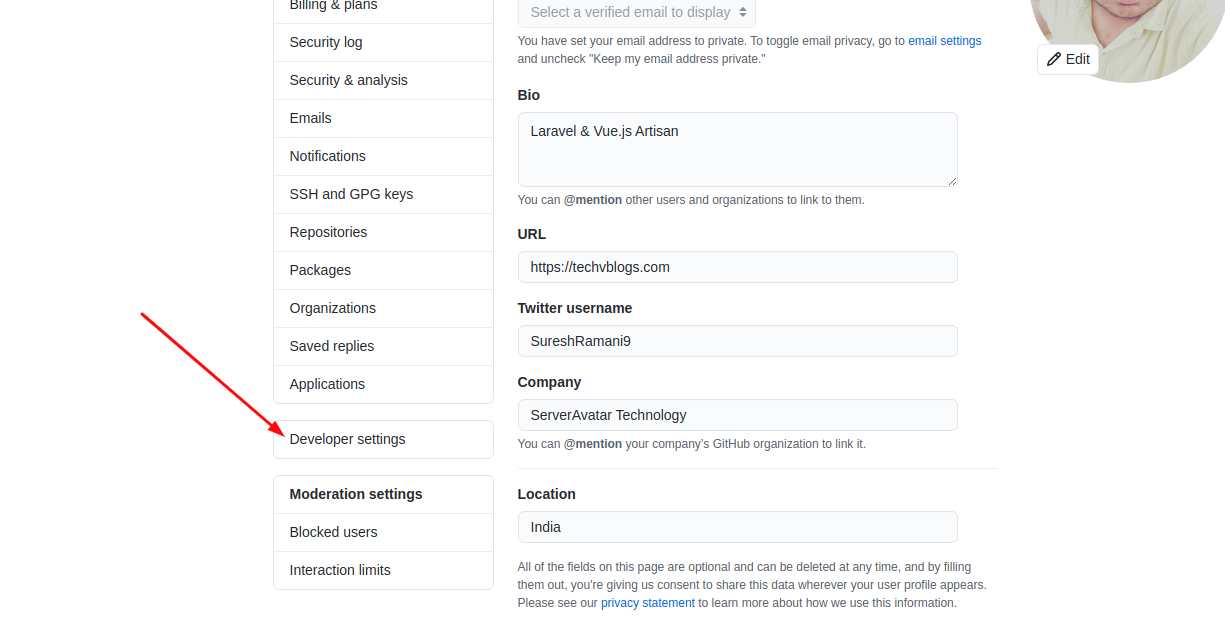
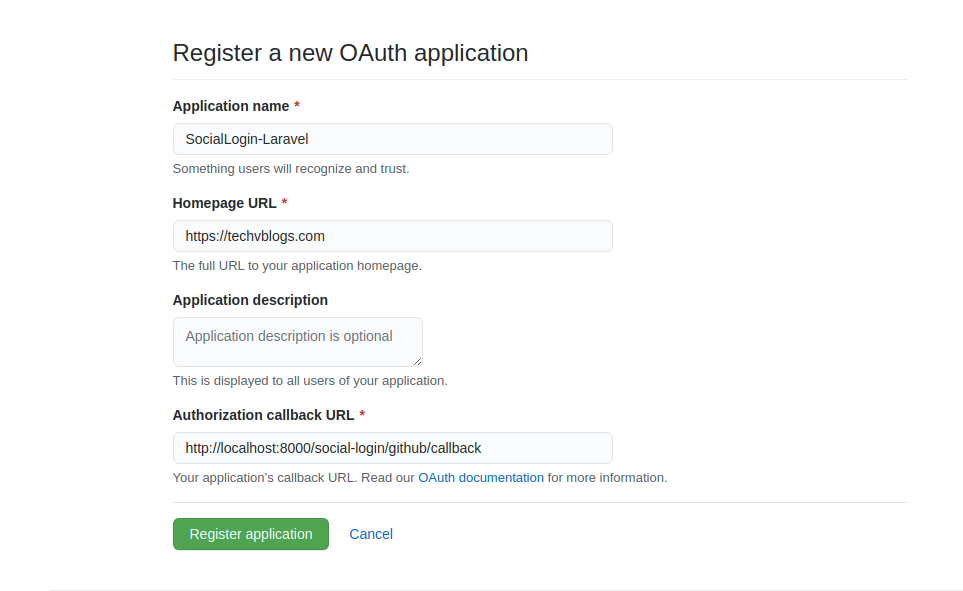
In the Developer settings page in the sidebar click on OAuth Apps and Click on Register a new application.
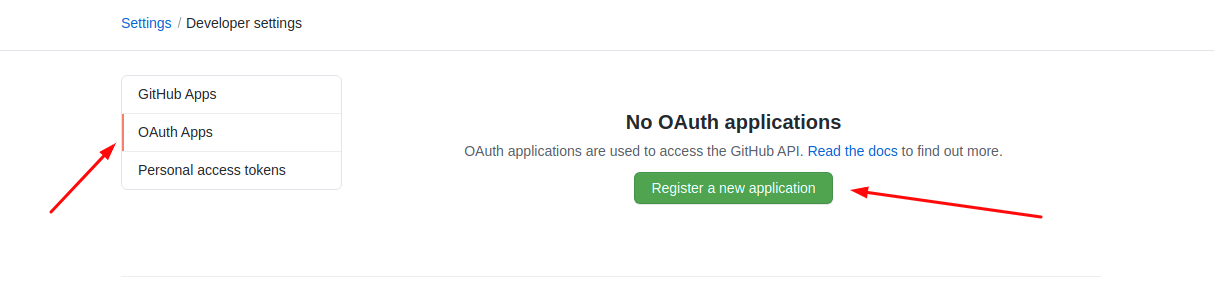
2. Register a new OAuth Application
Fill all the required field to create OAuth Application.
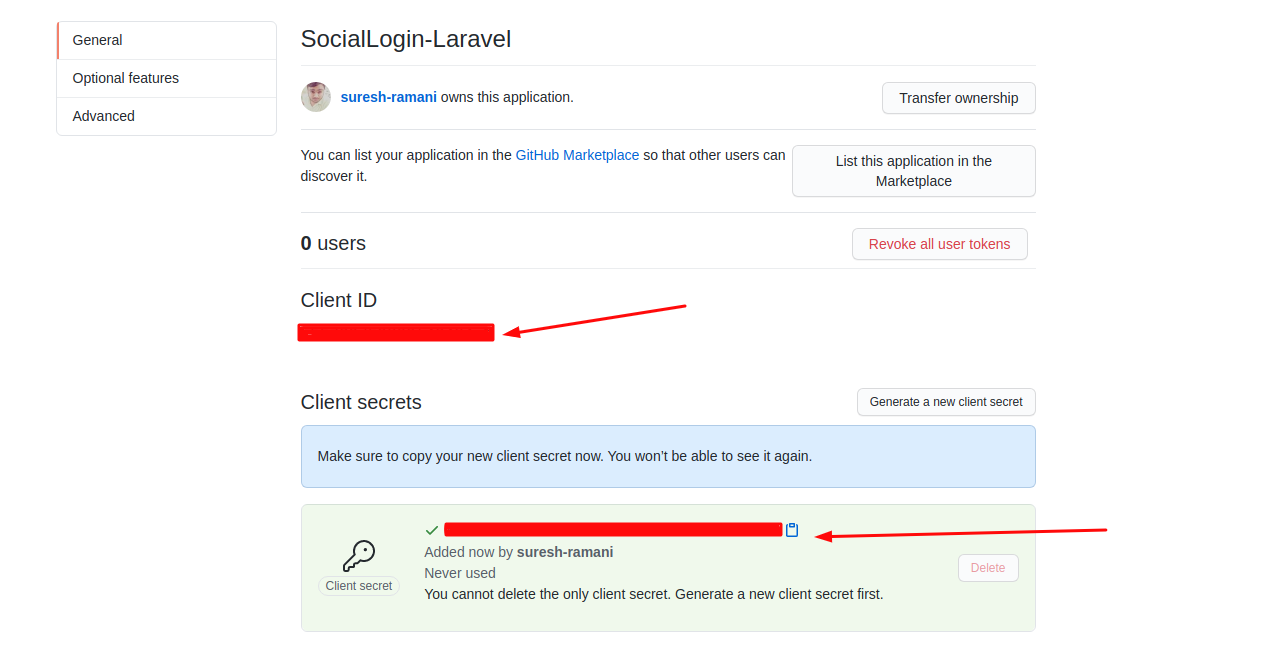
In last step, you can see your Client ID. You can see your Client Secret after click on Generate a new client secret button.
Then update our config/services.php and the .env file with your GitHub credentials.
.env
GITHUB_CLIENT_ID='YOUR GITHUB CLIENT ID'
GITHUB_CLIENT_SECRET='YOUR GITHUB CLIENT SECRET'
GITHUB_CALLBACK_URL="${APP_URL}/social-auth/github/callback"
config / services.php
'github' => [
    'client_id' => env('GITHUB_CLIENT_ID'),
    'client_secret' => env('GITHUB_CLIENT_SECRET'),
    'redirect' => env('GITHUB_CALLBACK_URL'),
]
4. Create Social Login Controller, Model and Migration
php artisan make:controller Auth/SocialLoginController
php artisan make:model SocialAccount -m
-m this option will create migration file.
database / migrations / xxxxxx_create_social_accounts_table.php
use Illuminate\Database\Migrations\Migration;
use Illuminate\Database\Schema\Blueprint;
use Illuminate\Support\Facades\Schema;

class CreateSocialAccountsTable extends Migration
{
    /**
     * Run the migrations.
     *
     * @return void
     */
    public function up()
    {
        Schema::create('social_accounts', function (Blueprint $table) {
            $table->id();
            $table->bigInteger('user_id')->unsigned();
            $table->foreign('user_id')->references('id')->on('users')->onDelete('cascade');
            $table->string('provider_name')->nullable();
            $table->string('provider_id')->unique()->nullable();
            $table->timestamps();
        });
    }

    /**
     * Reverse the migrations.
     *
     * @return void
     */
    public function down()
    {
        Schema::dropIfExists('social_accounts');
    }
}
Now run this migration command to create tables in database
php artisan migrate
app / Models / SocialAccount.php
namespace App\Models;

use Illuminate\Database\Eloquent\Factories\HasFactory;
use Illuminate\Database\Eloquent\Model;

class SocialAccount extends Model
{
    use HasFactory;

    protected $fillable = [
        'user_id', 'provider_name', 'provider_id'
    ];

    // User
    public function user(){
        return $this->belongsTo(User::class);
    }
}
app / Models / User.php
Each user can have many linked social accounts, which implies a one-to-many relationship between User and SocialAccounts. To define this relationship, we add the following method to the User model:
namespace App\Models;

use Illuminate\Contracts\Auth\MustVerifyEmail;
use Illuminate\Database\Eloquent\Factories\HasFactory;
use Illuminate\Foundation\Auth\User as Authenticatable;
use Illuminate\Notifications\Notifiable;

class User extends Authenticatable
{
    use HasFactory, Notifiable;

    /**
     * The attributes that are mass assignable.
     *
     * @var array
     */
    protected $fillable = [
        'name',
        'email',
        'password',
    ];

    /**
     * The attributes that should be hidden for arrays.
     *
     * @var array
     */
    protected $hidden = [
        'password',
        'remember_token',
    ];

    /**
     * The attributes that should be cast to native types.
     *
     * @var array
     */
    protected $casts = [
        'email_verified_at' => 'datetime',
    ];

    public function socialAccounts(){
        return $this->hasMany(socialAccount::class);
    }
}
app / Http / Controllers / Auth / SocialLoginController.php
In Controller We add two function redirectToProviderand providerCallback. In redirectToProviderfunction we get $provideras argument in $provider variable we get facebook, twitter or github then we pass this variable to our socialite drive then we redirect to their sites for authentication. As well as in providerCallback function we find social user then find that user in our database if we get that account then find that user and login either we create account and user both then login that's it.
namespace App\Http\Controllers\Auth;

use App\Http\Controllers\Controller;
use Illuminate\Http\Request;
use App\Models\User;
use App\Models\SocialAccount;

class SocialLoginController extends Controller
{
    public function redirectToProvider(String $provider){
        return \Socialite::driver($provider)->redirect();
    }

    public function providerCallback(String $provider){
        try{
            $social_user = \Socialite::driver($provider)->user();

            // First Find Social Account
            $account = SocialAccount::where([
                'provider_name'=>$provider,
                'provider_id'=>$social_user->getId()
            ])->first();

            // If Social Account Exist then Find User and Login
            if($account){
                auth()->login($account->user);
                return redirect()->route('home');
            }

            // Find User
            $user = User::where([
                'email'=>$social_user->getEmail()
            ])->first();

            // If User not get then create new user
            if(!$user){
                $user = User::create([
                    'email'=>$social_user->getEmail(),
                    'name'=>$social_user->getName()
                ]);
            }

            // Create Social Accounts
            $user->socialAccounts()->create([
                'provider_id'=>$social_user->getId(),
                'provider_name'=>$provider
            ]);

            // Login
            auth()->login($user);
            return redirect()->route('home');

        }catch(\Exception $e){
            return redirect()->route('login');
        }
    }
}
routes / web.php
Add two routes in our routes / web.php. One route for redirect to social site for authentication and other one for get detail about authenticated user.
use App\Http\Controllers\Auth\SocialLoginController;

Route::get('social-auth/{provider}/callback',[SocialLoginController::class,'providerCallback']);
Route::get('social-auth/{provider}',[SocialLoginController::class,'redirectToProvider'])->name('social.redirect');
5. Changes in Logn and Register Blade File
We need to add social account link in our login and register blade file.
resources / view / auth / login.blade.php
@extends('layouts.app')

@section('content')
<div class="container">
    <div class="row justify-content-center">
        <div class="col-md-8">
            <div class="card">
                <div class="card-header">{{ __('Login') }}</div>

                <div class="card-body">
                    <form method="POST" action="{{ route('login') }}">
                        @csrf

                        <div class="form-group row">
                            <label for="email" class="col-md-4 col-form-label text-md-right">{{ __('E-Mail Address') }}</label>

                            <div class="col-md-6">
                                <input id="email" type="email" class="form-control @error('email') is-invalid @enderror" name="email" value="{{ old('email') }}" required autocomplete="email" autofocus>

                                @error('email')
                                    <span class="invalid-feedback" role="alert">
                                        <strong>{{ $message }}</strong>
                                    </span>
                                @enderror
                            </div>
                        </div>

                        <div class="form-group row">
                            <label for="password" class="col-md-4 col-form-label text-md-right">{{ __('Password') }}</label>

                            <div class="col-md-6">
                                <input id="password" type="password" class="form-control @error('password') is-invalid @enderror" name="password" required autocomplete="current-password">

                                @error('password')
                                    <span class="invalid-feedback" role="alert">
                                        <strong>{{ $message }}</strong>
                                    </span>
                                @enderror
                            </div>
                        </div>

                        <div class="form-group row">
                            <div class="col-md-6 offset-md-4">
                                <div class="form-check">
                                    <input class="form-check-input" type="checkbox" name="remember" id="remember" {{ old('remember') ? 'checked' : '' }}>

                                    <label class="form-check-label" for="remember">
                                        {{ __('Remember Me') }}
                                    </label>
                                </div>
                            </div>
                        </div>

                        <div class="form-group row">
                            <div class="col-md-8 offset-md-4">
                                <button type="submit" class="btn btn-primary">
                                    {{ __('Login') }}
                                </button>

                                @if (Route::has('password.request'))
                                    <a class="btn btn-link" href="{{ route('password.request') }}">
                                        {{ __('Forgot Your Password?') }}
                                    </a>
                                @endif
                            </div>
                        </div>

                        <h5 class="text-center">Or</h5>

                        <div class="row">
                            <div class="col-12 text-center">
                                <a href="{{ route('social.redirect','facebook') }}" class="btn btn-primary">Login with Facebook</a>
                                <a href="{{ route('social.redirect','github') }}" class="btn btn-success">Login with Github</a>
                            </div>
                        </div>
                    </form>
                </div>
            </div>
        </div>
    </div>
</div>
@endsection
resources / view / auth / register.blade.php
@extends('layouts.app')

@section('content')
<div class="container">
    <div class="row justify-content-center">
        <div class="col-md-8">
            <div class="card">
                <div class="card-header">{{ __('Register') }}</div>

                <div class="card-body">
                    <form method="POST" action="{{ route('register') }}">
                        @csrf

                        <div class="form-group row">
                            <label for="name" class="col-md-4 col-form-label text-md-right">{{ __('Name') }}</label>

                            <div class="col-md-6">
                                <input id="name" type="text" class="form-control @error('name') is-invalid @enderror" name="name" value="{{ old('name') }}" required autocomplete="name" autofocus>

                                @error('name')
                                    <span class="invalid-feedback" role="alert">
                                        <strong>{{ $message }}</strong>
                                    </span>
                                @enderror
                            </div>
                        </div>

                        <div class="form-group row">
                            <label for="email" class="col-md-4 col-form-label text-md-right">{{ __('E-Mail Address') }}</label>

                            <div class="col-md-6">
                                <input id="email" type="email" class="form-control @error('email') is-invalid @enderror" name="email" value="{{ old('email') }}" required autocomplete="email">

                                @error('email')
                                    <span class="invalid-feedback" role="alert">
                                        <strong>{{ $message }}</strong>
                                    </span>
                                @enderror
                            </div>
                        </div>

                        <div class="form-group row">
                            <label for="password" class="col-md-4 col-form-label text-md-right">{{ __('Password') }}</label>

                            <div class="col-md-6">
                                <input id="password" type="password" class="form-control @error('password') is-invalid @enderror" name="password" required autocomplete="new-password">

                                @error('password')
                                    <span class="invalid-feedback" role="alert">
                                        <strong>{{ $message }}</strong>
                                    </span>
                                @enderror
                            </div>
                        </div>

                        <div class="form-group row">
                            <label for="password-confirm" class="col-md-4 col-form-label text-md-right">{{ __('Confirm Password') }}</label>

                            <div class="col-md-6">
                                <input id="password-confirm" type="password" class="form-control" name="password_confirmation" required autocomplete="new-password">
                            </div>
                        </div>

                        <div class="form-group row">
                            <div class="col-md-6 offset-md-4">
                                <button type="submit" class="btn btn-primary">
                                    {{ __('Register') }}
                                </button>
                            </div>
                        </div>

                        <h5 class="text-center">Or</h5>

                        <div class="row mt-3">
                            <div class="col-12 text-center">
                                <a href="{{ route('social.redirect','facebook') }}" class="btn btn-primary">Login with Facebook</a>
                                <a href="{{ route('social.redirect','github') }}" class="btn btn-success">Login with Github</a>
                            </div>
                        </div>
                    </form>
                </div>
            </div>
        </div>
    </div>
</div>
@endsection
Now run the project
php artisan serve
Thank you for reading this blog.

